
This is Part 5 of my tree building tutorial. you can access the other parts from the bottom of the page.
Whilst Mudbox has tools to extract various maps it’s not the most flexible system and it’s fairly slow. You could export your high and low resolution meshes and bake the normals in 3DS Max but once you get into the many millions of polygons Max will struggle under the pressure. This is where a fantastic (and free!) utility called xNormal comes in, you can use it to bake all your maps and retain a fair amount of control over how they’re generated. It’s pretty quick as well so this is the option we’ll use.
To get started first export the level 1 and the top level mesh from Mudbox as .obj files. You should also export both your Diffuse and Bump channels from Mudbox, right click on any of the paint layers in each channel and chose Export channels to Photoshop. Switch over to photoshop and turn off the uv layer at the top of both and save yourself a bitmap version of each file asa JPEG or TIFF. We’re going to need to the diffuse channel in xNormal.
You’ll need to install xNormal (download link) before getting started. You should have an OBJ file for both the high resolution, which for me was level 7. Also an export for the low resolution model, I opted for level 1 rather than 0, however if you’re doing this for a real-time engine you might want to spend the time re-topologising your low resolution mesh to get the most efficient model possible.
Open up xNormal and you’ll be greeted by it’s late 1990s UI style, but don’t worry – whilst it looks a little bonkers – it’s the perfect tool for the job.

Along the right hand side there’s a series of buttons or tabs. Start with High definition meshes, in the list box right click and add your level 7 obj file from Mudbox. To the right of the File column you should see Base texture to bake, load your diffuse map from Photoshop into this slot. Now add your low resolution in exactly the same way (no need to add a base texture to this mesh).
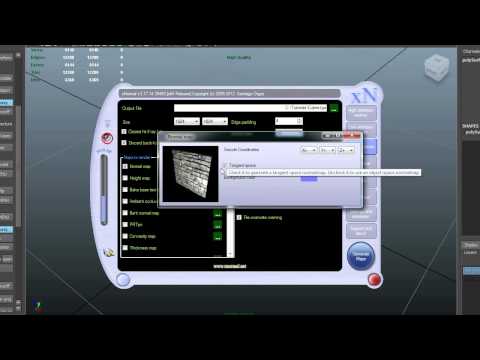
The next tab is baking options, at the top specify a base file name for your maps. Then select the maps to be be rendered out. I elected for the following maps:
I left most of the option as defaults other than opening up the Normal map options (by hitting the … button) and reversing the Y direction of the normal map. This matches how 3DS Max reads normals. It’s also worth point out that just under the Output file option there’s a spinner marked Edge padding, this dilates the pixels around the border of your bake to avoid nasty edges when they’re re-sized or mip-mapped in a games engine, I set mine to 4 pixels but be careful in case your various uv shells start bleeding into each other.
You should also choose a decent resolution for your maps. I went with 2048×2048.
At this point you could hit Generate Maps and xNormal will do it’s thing and eventually save out your maps. More than likely you’ll get some artifacts as some branches will end up projected onto the trunk. This is a common issue for meshes with arms, fingers and legs where they extend out from a surface at an angle. You can see an example of the type of problem below.

To prevent this switch to the tools tab and select Ray distance calculator. Press go and xNormal will attempt to calculate the min and max distances that rays should travel. It’ll pre-process for a while and then begin calculating the values, you can leave it going as long as you like and it’ll refine the accuracy. However I found that after 60 seconds the values were hardly changing and so that seemed a good point to stop. So hit Stop and then Copy Values. Switch to the Low definition meshes tab and you should see the min and max values have been copied across.
You’re now ready to bake out your maps by hitting Generate Maps.
Once you’re done you can see a rough preview of how they look using the built in xNormal 3D viewer. Make sure you turn off the visability of your high res mesh, switch to the 3D viewer and add the normals and base texture map that xNormal just generated. Now hit Launch viewer and you should be able to see your low resolution 3D tree with the maps applied. If you’re happy it’s time to head back to max and put them together.
If you think you might need to come back to your baking your can save your settings by choosing the settings and examples tab and choose save settings up a the top. Close down xNormal and switch to 3DS Max.
I manually combined my diffuse, occlusion and cavity map in photoshop by multiplying the ambient occlusion and cavity maps over the diffuse and saving out a new bitmap. But you could choose to use a composite shader in max if you wanted to retain control.
Load up your low resolution mesh in 3DS Max and open the materials editor. Create a new material and add your diffuse, normal and bump maps. To add the normal map you’ll need to grab a Normal Bump from under the maps section in the material editor. I hooked everything up as below.

If in Max you find that your imported tree model is larger than the original it’s probably due to the OBJ format working in cm rather than inches as in 3DS Max. To fix this scale your new mesh by 39.3 in all directions and it should be the back to the correct scale.
At this point everything is ready go with the tree model. In the final section we’ll look at creating the smaller branches and leaves.
If you want to learn more about baking normal maps this video by Michael Hosticka deals with the basics and how to avoid a number of common issues.


 >
>